
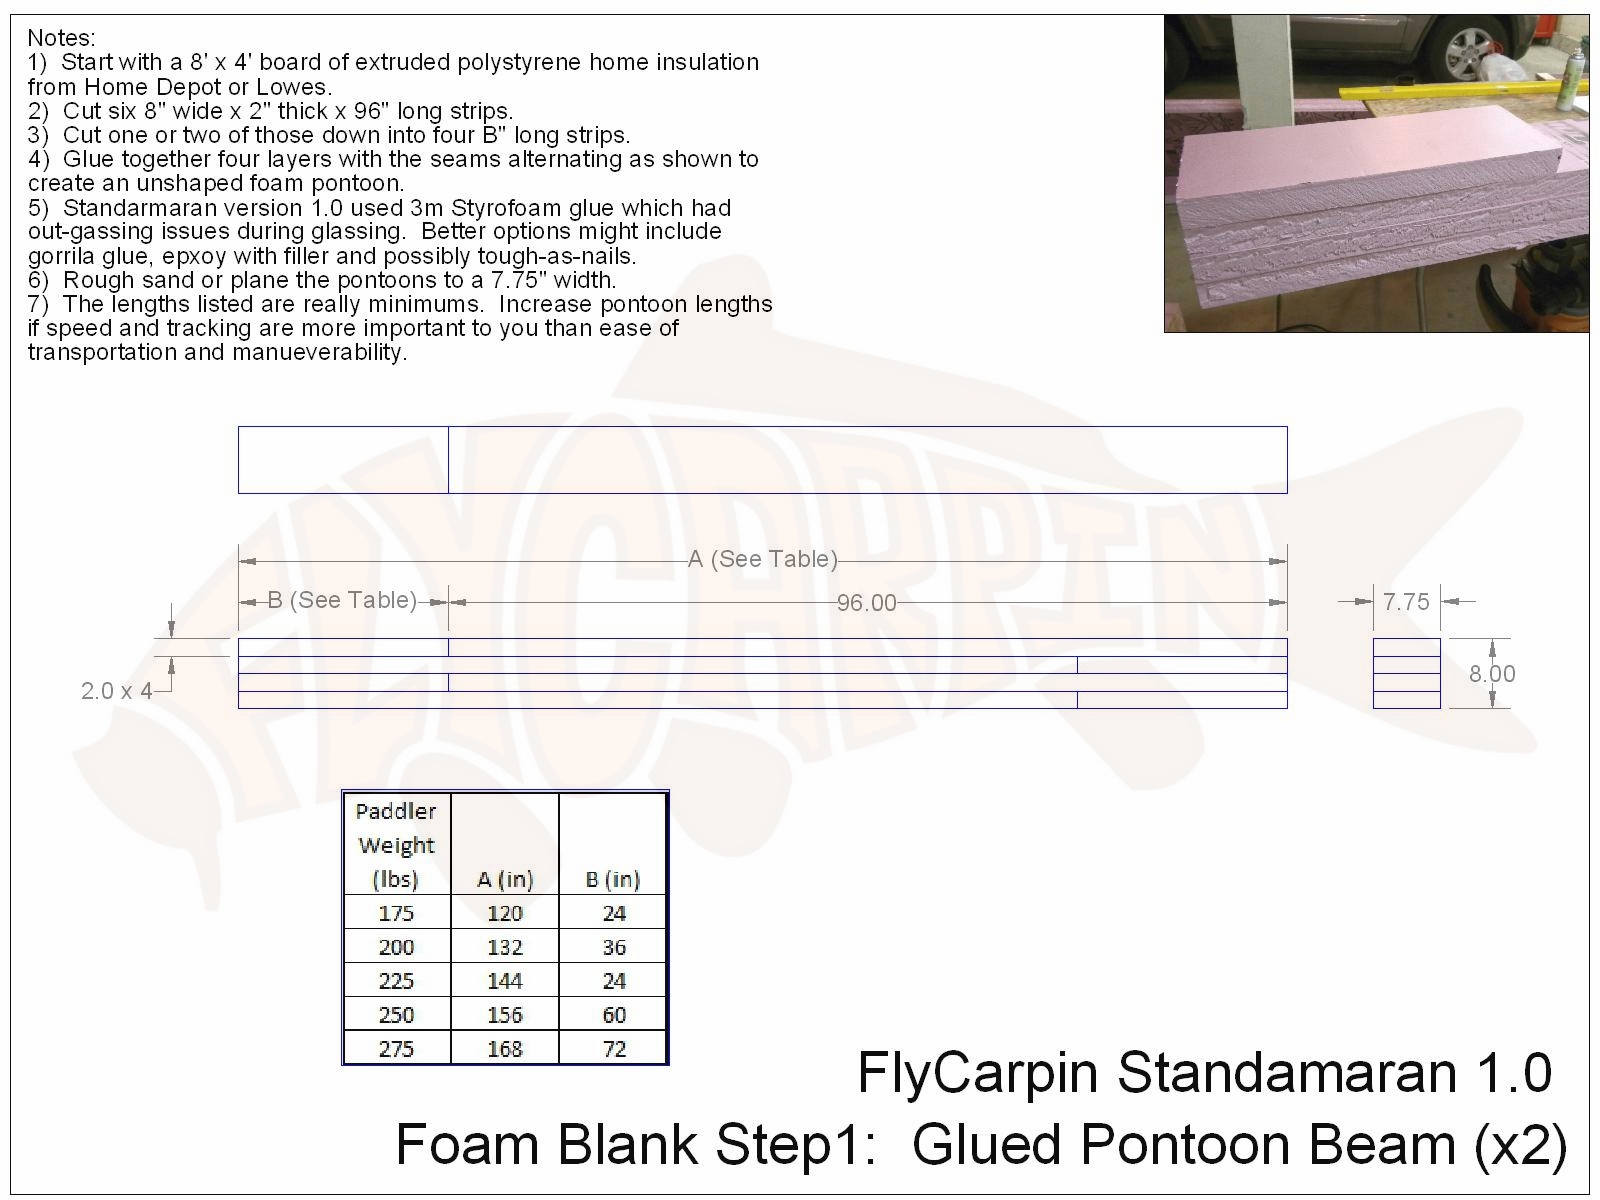
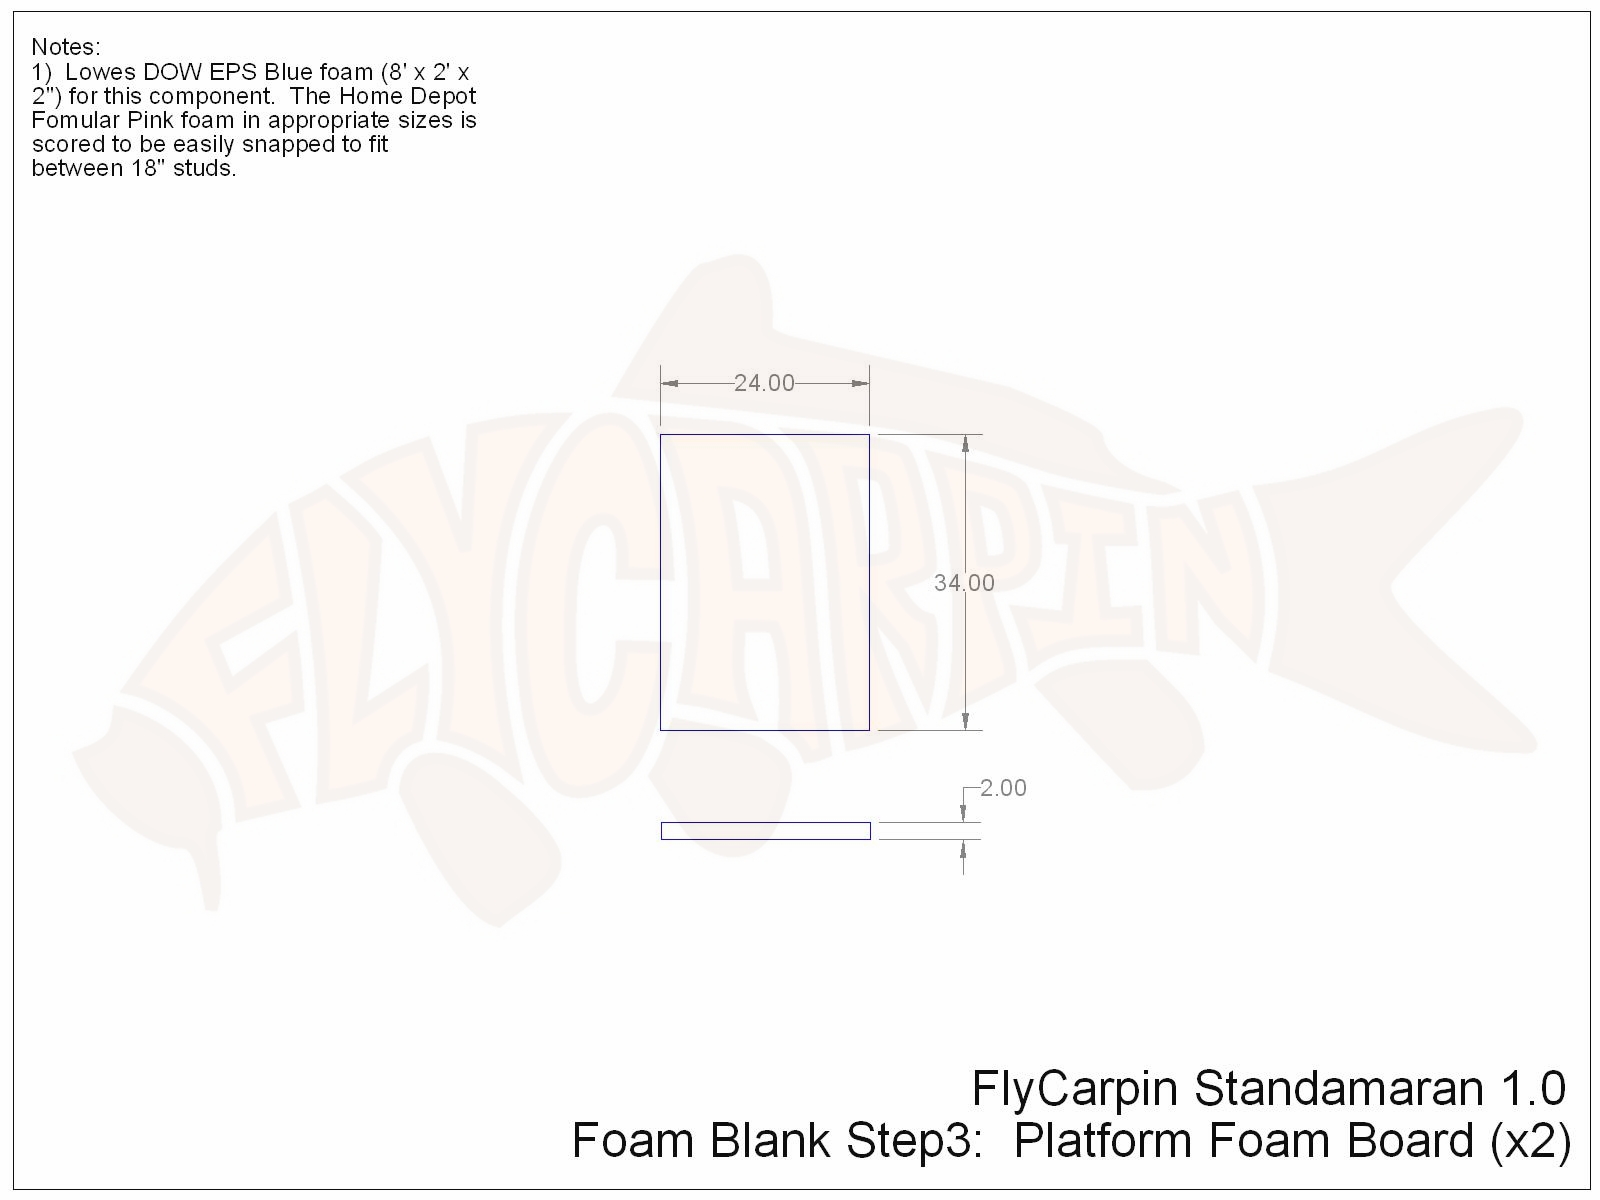
I build this board out of Home Depot and Lowes extruded polystyrene (XPS) home insulation which is easily accessible virtually anywhere.
 This is just how I built mine, and it was specifically designed with fly fishing for carp on the flats. If you are thinking of making your own stand up paddle board and like the concept of a standamaran you should customize it to your own wants and needs! The most likely change you may want to make is to make the pontoons longer for improved speed and tracking. Additionally, if you are much heavier than I am (~175 to 185lbs) you will need to make the pontoons longer in order to add buoyancy.
Single-click to enlarge any of the drawings or pictures. Feel free to download them for personal non-commercial use but do not re-publish them without written permission
If you do decide to build your own board of any kind, be sure and check out swalylocks for general advice and surfersteve for the first time builder.
PHASE1: Building and Shaping The Foam Blank:
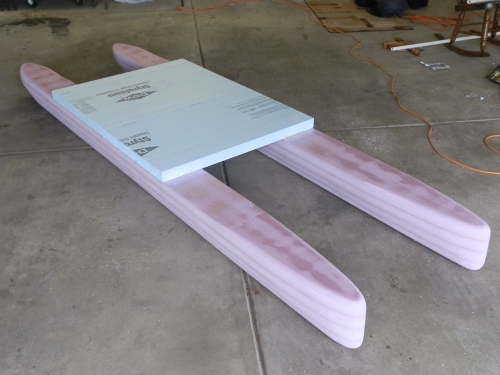
My standamaran was built using methods similar to surf-board and traditional SUP manufacturing. The process starts with a shaped foam blank which provides the shape of the board and provides floatation. This blank was built out of Home Depot XPS foam which is virtually impermeable to water.


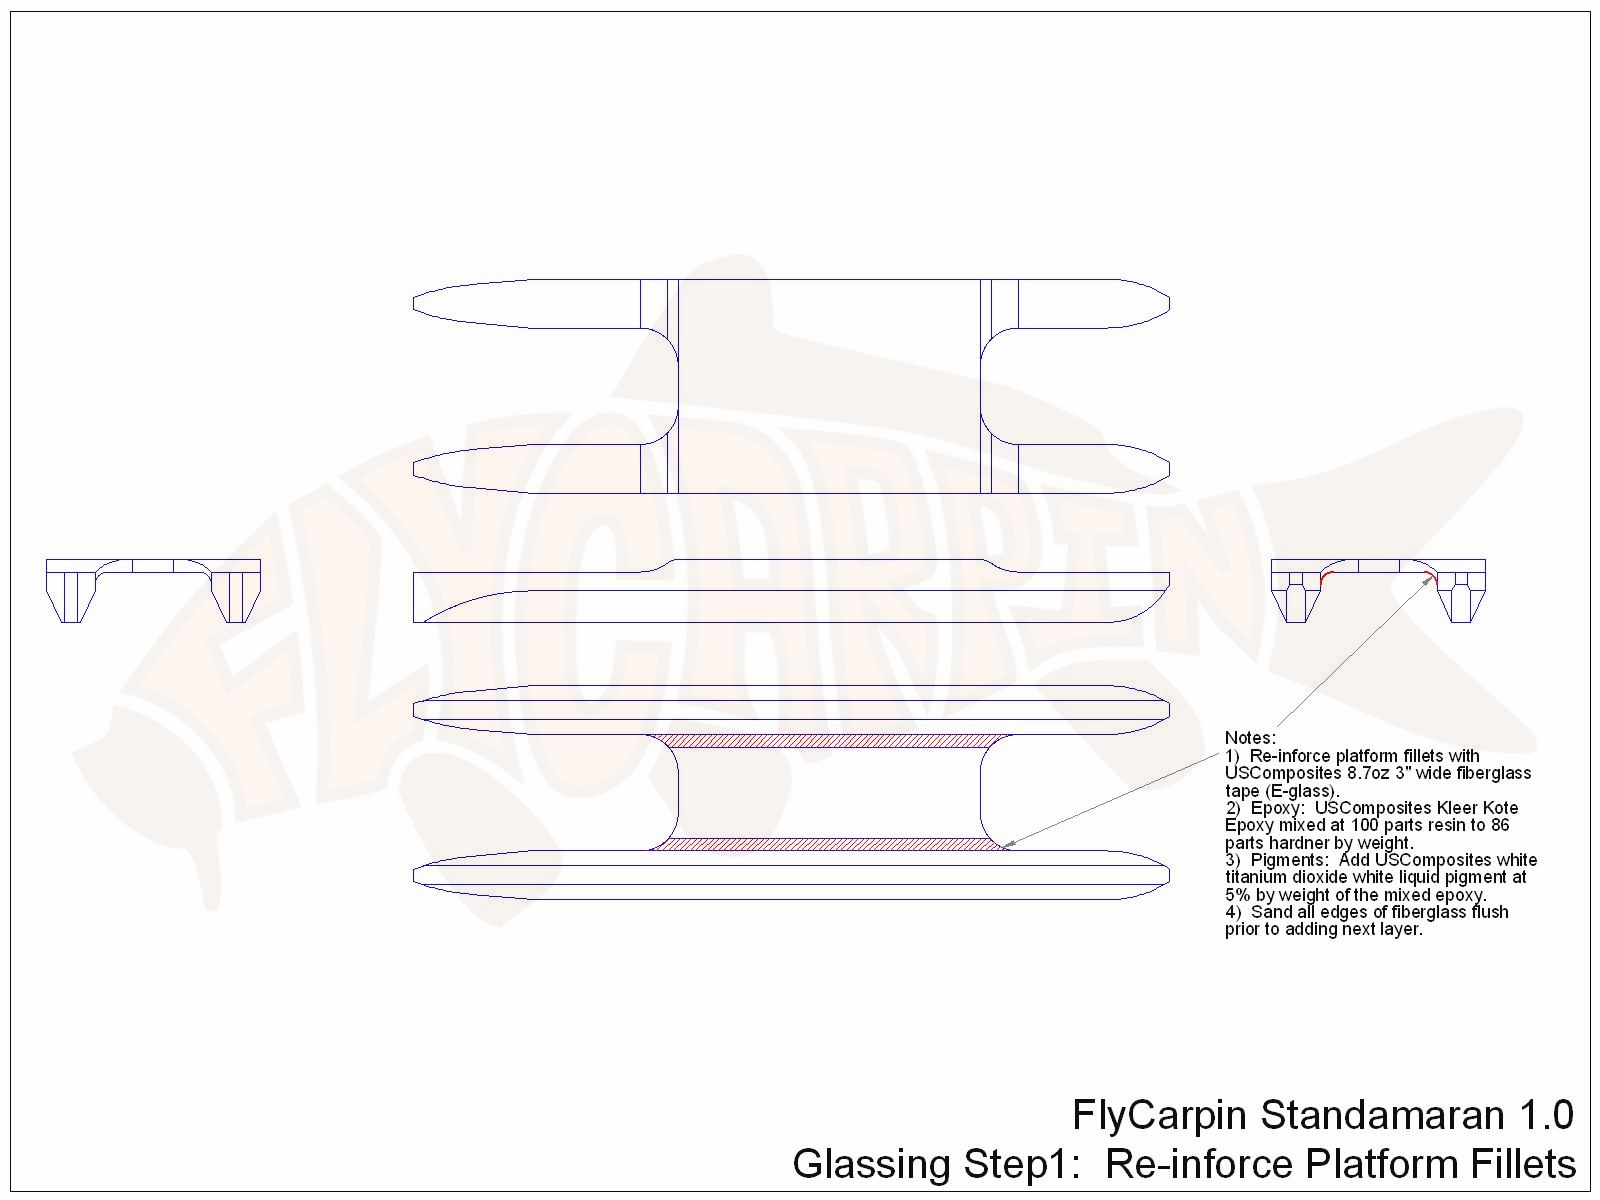
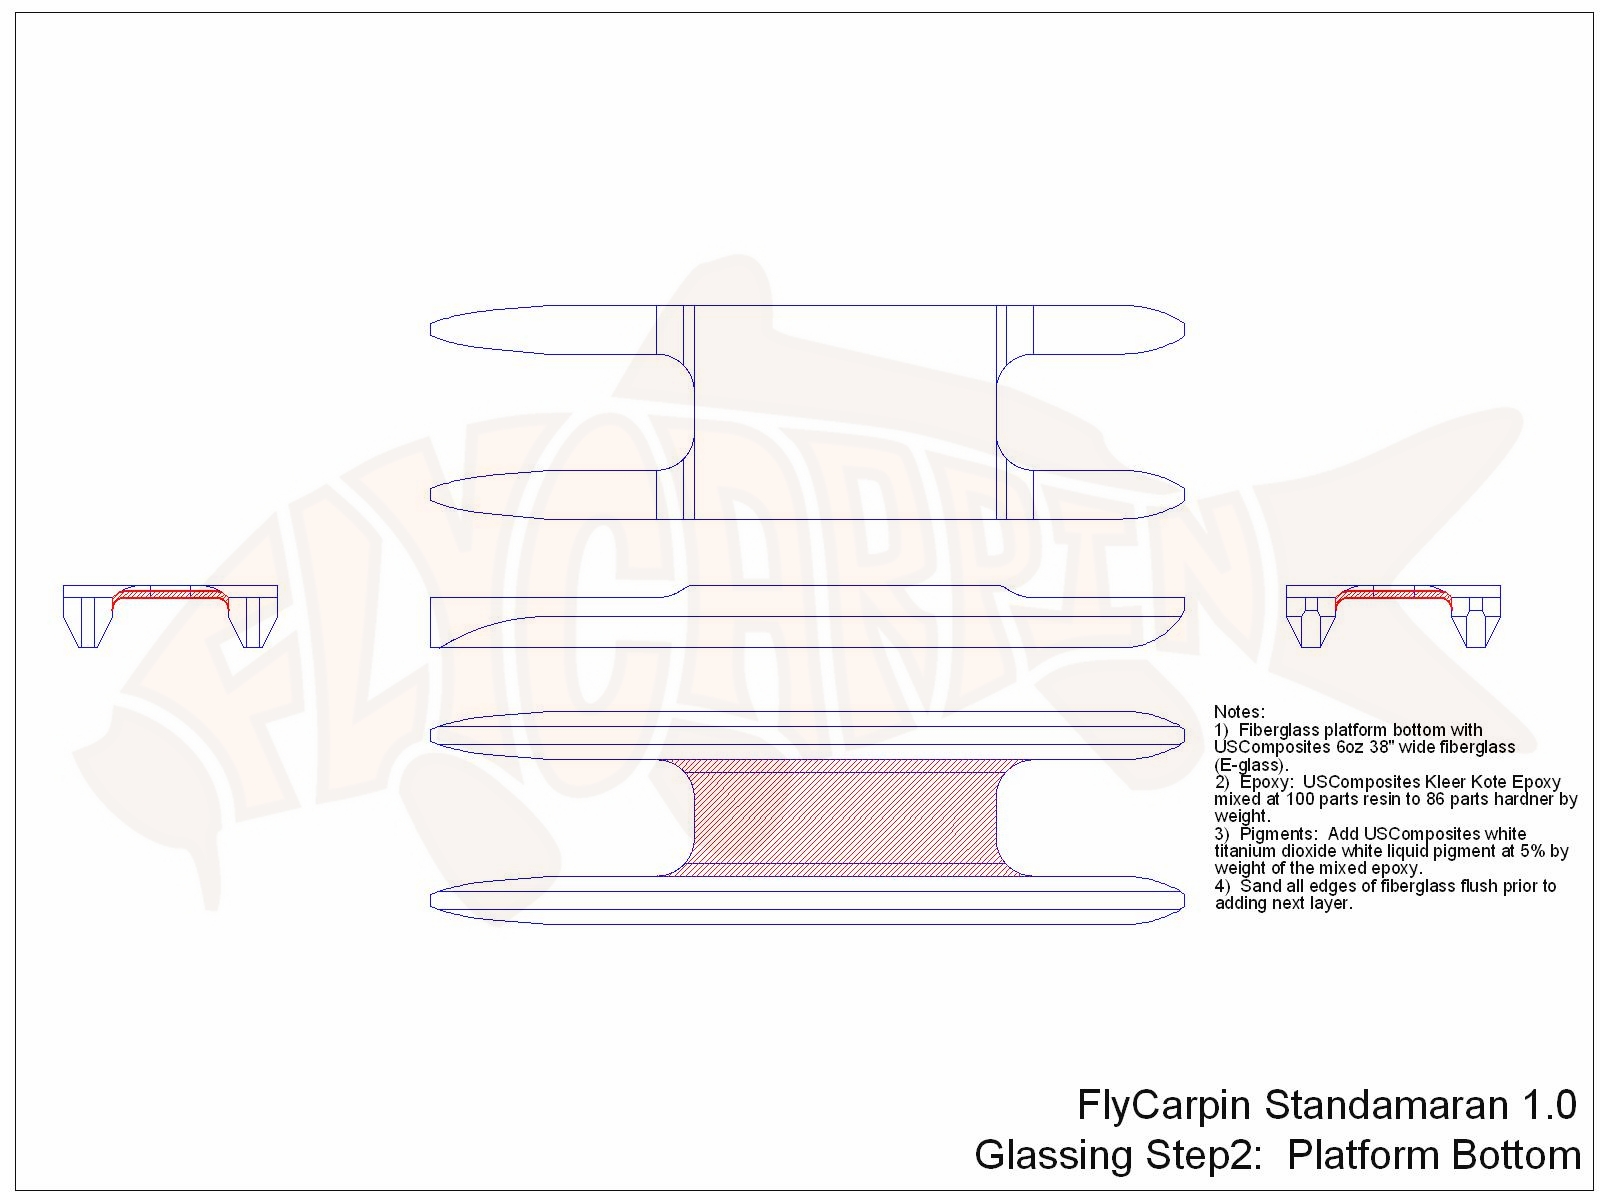
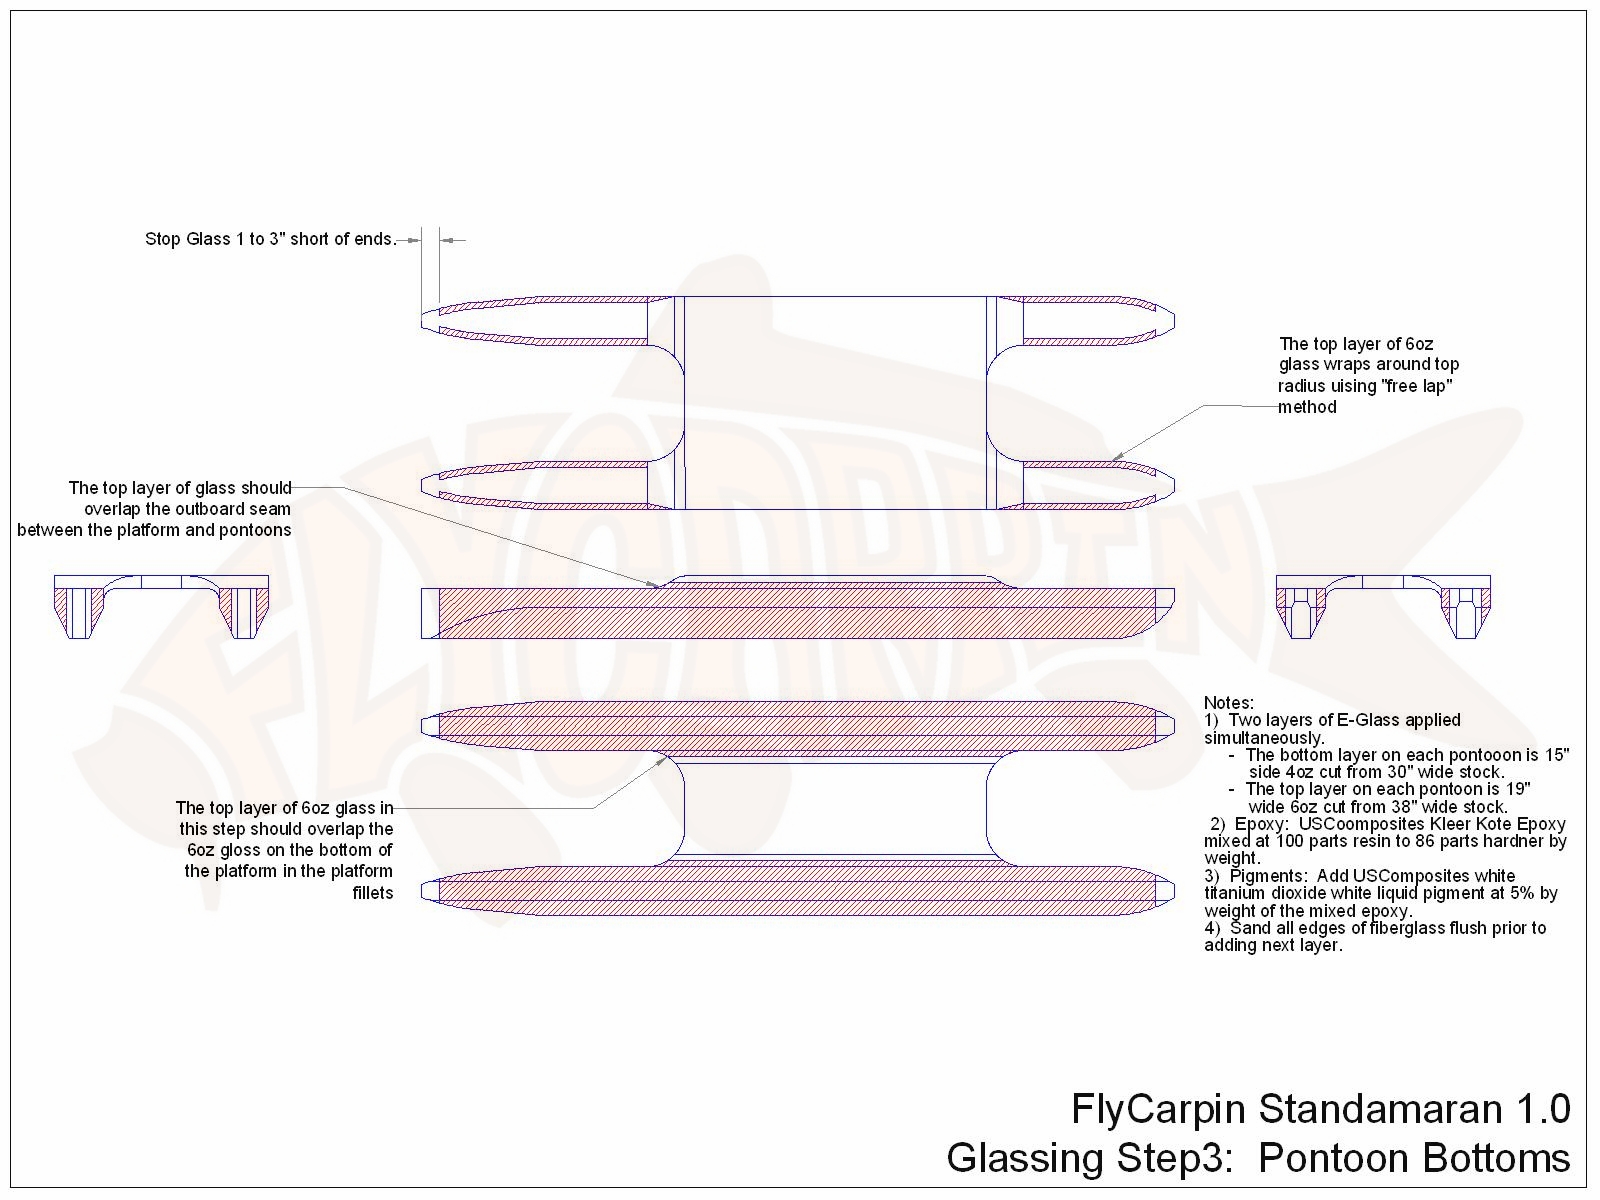
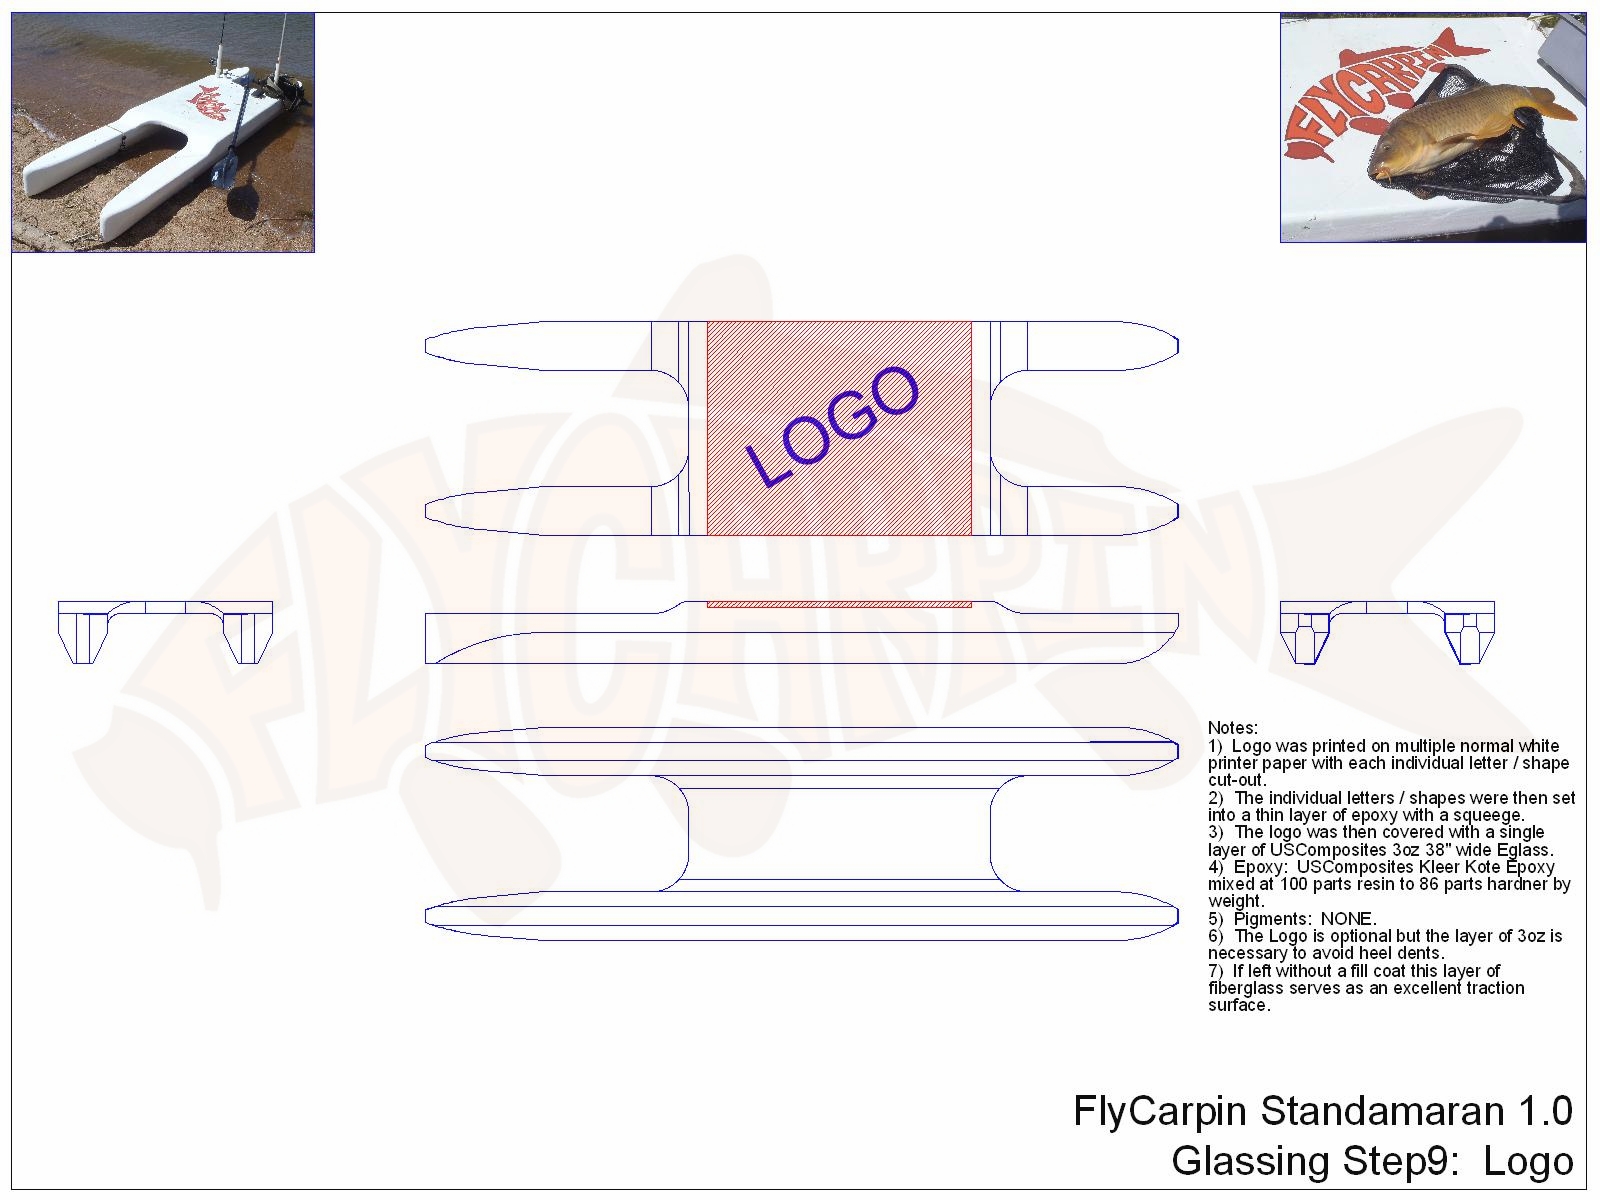
PHASE2: Glassing:
The foam is then covered in a thin layer of fiberglass which provides strength and durability. Because I used XPS foam the fiberglass is applied using epoxy resin which will not eat the polystyrene foam.
I added white pigment to the epoxy to avoid heating the blank and causing de-lamination due to expansion of trapped air. XPS has more risk of de-lamination due to heat than other foams because it is non-porous to the point where air cannot migrate through the blank making the addition of vents ineffective..


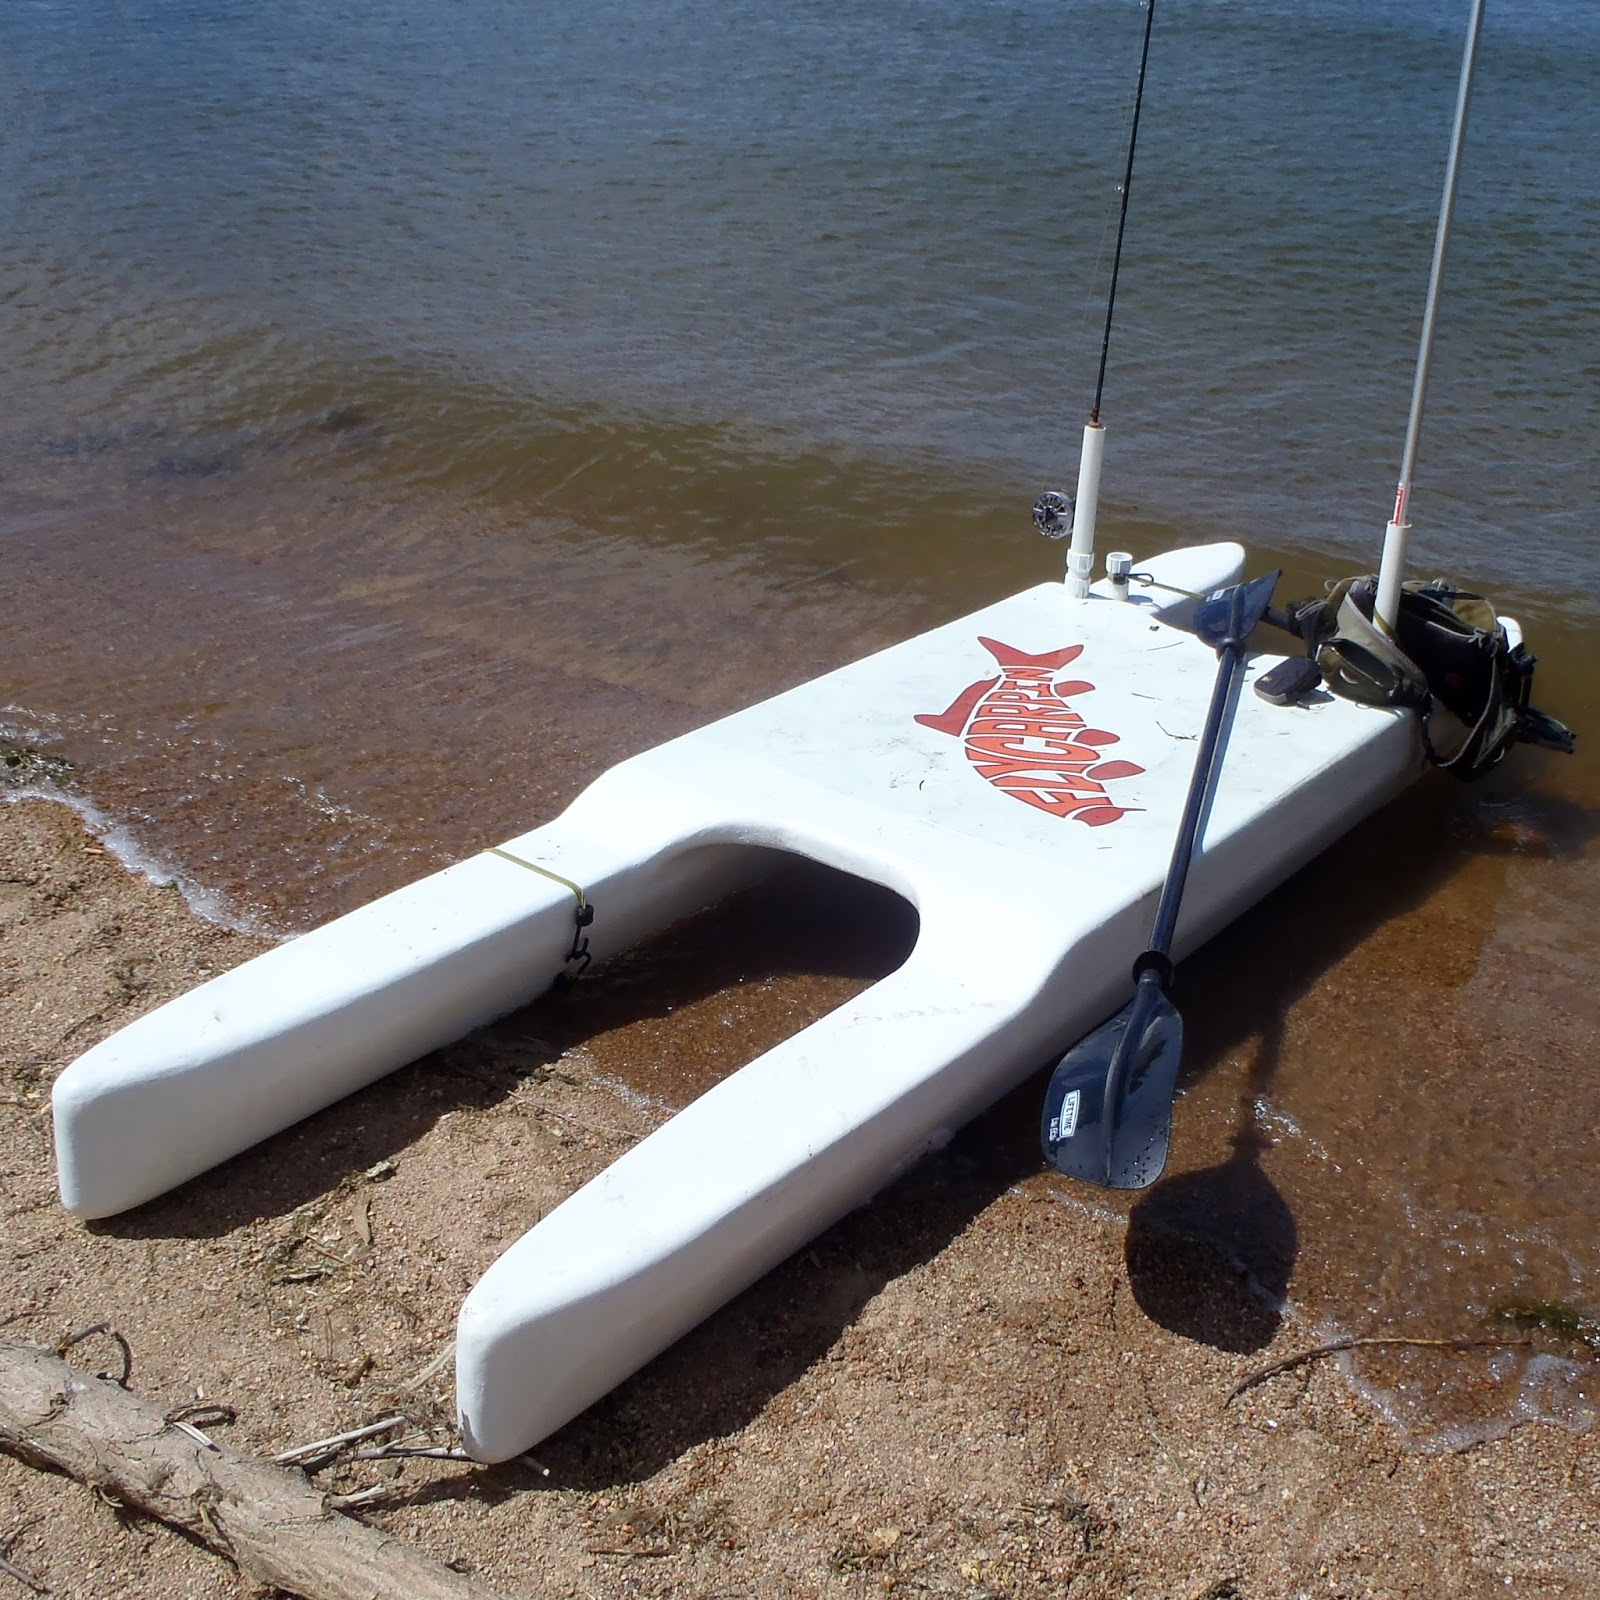
UPDATE: January 2016: I have now probably spent something on the order of 100 carp on it, including my biggest Colorado Carp on the Fly to date. This thing is a blast to fish from.
What it absolutely rocks at: This design is extraordinarily stable. I have never once, even for a second, been remotely close to falling off sideways while standing up. I have, however fallen off forward/backward twice. Once when I was still getting used to it I leaned too far back and it skated forward out from underneath me and I did the Nestea plunge in about 3' of water. The other time I was poling it backwards out of a small inlet and bottomed out on a 4" deep sandbar. Once again, I went over backwards!
The fiberglass schedule detailed above is pretty robust. Probably 50% of the time I have spent on this thing has been in flooded timber and brush. As you can imagine that has led to a significant amount of abuse - but I have had no significant durability issues beyond a few new small holes in the fiberglass which I have not even bothered to fix and does not ruin the SUP because the Extruded Polystyrene (XPS) core is virtually impervious to water.
What it has issues with: This is a great stand-up fly fishing platform but isn't necessarily very fast. I usually treat it like a sit-on-top kayak when going from point A to point B. Even when I am able to continously paddle sitting down it is a little slower than a beginner level SUP designed more for stability than performance. Once again, if you want a faster SUP, make the pontoons a foot or two longer!
I might just make this a project for my school!
ReplyDeleteVery cool, how much did this cost to make? I am thinking of making a paddle board.
ReplyDeleteNate - This cost 350 me dollars in materials PRIOR to rigging and without including any tools. I didn't keep very good track of the cost of rigging and tools, but that stuff seems to add up fast and I would count on about 500 hundred bucks your first time.
DeleteThis is really cool. I've been looking for a project like this. I'm just curious why you placed the platform so far to the stern side of center. It looks like the trim is off. Wouldn't you want the boat to be trim, with the freeboard of the bow and stern more or less the same? Perhaps the bow comes down a bit when under propulsion due to the force vector being applied much higher than a sit-down craft. In any case, thanks for sharing!
ReplyDeleteActually that was on purpose for two reasons. The first was that because the nose of the pontoons have a longer taper than the butt the center of bouyancy is closer to the stern than the bow. It was going to be hard to figure the center of bouyancy so I centered the platform over the center of gravity of the pontoons (pretty close to the same on this design) by balancing the pontoons on a cylinder until I found the CG. That wasnt perfect and I think I missed the actually center of bouyancy by a couple of inches BUT the platform is plenty long enough relative to the pontoons that you can go from extremely bow-down to extremely stern-down by moving to either end. In other words I never felt like I couldn't get whatever trim I wanted easily as built.
DeleteAdditionally you occasionally want to be able to get aft enough to get the nose up a little bit for maneuverability so I felt it was better to miss a little aft than forward.
Trevor, thanks for the reply. It makes sense. Sounds like you put a lot of thought into the trim issue. Did you consider making the boat in three pieces with the platform attached to the pontoons so that the trim could be adjusted by moving the platform fore or aft? I spend a lot of time in a solo canoe, and having the ability to adjust the trim for different conditions is a big plus in a solo canoe. Just a thought.
ReplyDeleteJust wondering, you said to cut the xps sheet into 8" wide by 2" thick by 96" long strips. All the xps sheets I've found are less than an inch thick. Am I missing something?
ReplyDeletehttp://m.homedepot.com/p/Owens-Corning-FOAMULAR-150-2-in-x-4-ft-x-8-ft-R-10-Scored-Squared-Edge-Insulation-Sheathing-45W/100320352
DeleteMy local Home Depots all carry this. Ask them if they have it. If yours don't carry it I guarantee you they will order it for in store pickup.
DeleteAlright thanks! When I looked online for my local Home Depot, those dimensions weren't listed. I'll follow your link and see what I can find
DeleteI've been brainstorming/designing a jon boat using this same method and saw your build on google images. Nice build!
ReplyDeleteLove this stuff. I am currently building mine. Where did you buy the epoxy and pigment. Did you use the pigment in every layer of glass? Why did you choose to paint the foam instead?
ReplyDeleteUS composites, I was real happy with them. Yes,,I used pigment in every layer. I didn't paint the foam instead because extruded polystyrene has more potential for delamination thsn compressed even without a layer of paint.
DeleteI'm a not so avid but somewhat capable DIY'er. I've been wanting to do some sailing for a long time, and finally got a boat capable of doing it by myself. It's a 13.5' SOT kayak, but I think it'll work for what I have in mind. Anyway, I was doing some mindless googling when I found somebody who put 2 SUP right next to each other with a sail in the middle. Looked like an awesome platform! The cost of course led me to looking at DIY projects, which is where I found your page. Honestly, your standamaran looks very similar to larger sailing boats. I think a bigger version of what you made would be perfect or a one or two person mini-sailboat. Maybe one of these days (probably if/when I retire in 20 years lol) I'll get around to it. In the meantime, dreams are free :D
ReplyDeleteCool Idea. It looks like your pontoons are 4 layers of foam. Could you leave layers one and four solid, but hollow out the middle of layers 2 and 3? Would the air void provide any significant difference in overall weight and/or buoyancy? I'm 6'5" 250 and looking at likely making my pontoons (perhaps much) longer, so I'm trying to eliminate any weight I can. I may also extend the deck for a little more space/dog first mate. Also, would an air void potentially try to expand if it got too hot?
ReplyDeleteYou will save about 3 to 6 lbs depending on how much longer your pontoons are BUT if you do it you have to have perfect fiberglass with no pinhole leaks. My fiberglass has roughly 1 gazillion pinhole leaks plus about 10 holes from tree branches and it is no big deal because extruded polystyrene does not absorb water. If you have a void in the middle though, that does (and will) absorb water unless everything is perfect. Which is really really hard to do, especially with extruded polystyrene. If you want to make the foam hollow I would go with expanded polystyrene because it is easier to glass extruded without getting pinhole leaks.
DeleteSorry, I meant it is easier to glass EXPANDED polystyrene without getting pinhole leaks.
ReplyDeleteNice build! Couple of questions. Could you expand the platform over most of the length without affecting performance? Can you mount anot electric motor?
ReplyDeleteOf course! I figure it is dead weight to put a platform the entire length, and you probably need to use longer pontoons to increase flotation and keep the ends of the platform from hitting waves. Trolling motor shouldnt be a problem.
DeleteThis is dope! Gonna be the flats boat for bones out in oahu.
ReplyDeleteQuestion 1: in table 1instruction 1 for foam column B says 225(lbs)-144(A)-24(B) I'm assuming that was supposed to say 42 based off the increments?
Question 2: I see you added rod holders and I have a plethora of designs in a folder. I was wondering if you drilled those holes and glued them in and wrapped with glass. Was curious how you went about it.
Question 3: if there was a v2.0 would you have used "pins" or rods to connect the platform to pontoons before glassy for added strength and load despersion?
This is dope! Gonna be the flats boat for bones out in oahu.
ReplyDeleteQuestion 1: in table 1instruction 1 for foam column B says 225(lbs)-144(A)-24(B) I'm assuming that was supposed to say 42 based off the increments?
Question 2: I see you added rod holders and I have a plethora of designs in a folder. I was wondering if you drilled those holes and glued them in and wrapped with glass. Was curious how you went about it.
Question 3: if there was a v2.0 would you have used "pins" or rods to connect the platform to pontoons before glassy for added strength and load despersion?
1) Yes, you are correct. That should have been 42.
Delete2) I cut teeth into the end of a foot long section of PVC pipe. I then cut a hole that diameter in the fiberglass and used the pvc pipe with teeth to "drill" out a hole the same size as the PVC about 6" deep. Then I folded some 13x3" long strips of wetted glass around the end of 8" PVC pipe with a threaded fitting on the end and shoved it in the new hole and then folded down the ends of the fiberglass sticking out of the hole down. This glued in the PVC pipe with theaded ends permanently inside the foam. Then you can just make rod holders or tool racks or whatever you want out of PVC pipe and fittings.
3) Yes, for V2.0 I would like to make it modular. Not out of any need for strength. I have put hundreds of hours over three+ years on it and caught somewhere around 200 carp. It is plenty strong, with the only issue being some minor de-laminations in a several areas that was more due to inexperience glassing than the design. For 2.0, I would like to make it modular though so that I can take it apart into a smaller package. I would LOVE if I could break it down small enough to get it on a plane, even as over-sized. Figuring out a system for making it modular without creating weaknesses has defeated my imagination so far though. Any ideas?
What was your final glassed weight before rigging?
ReplyDeleteThought you might like to see another XPS project that turned out to be very lightweight and robust, my Camp Capsule foam camp trailer:
ReplyDeletehttp://www.tnttt.com/viewtopic.php?f=55&t=64860&p=1152390&hilit=camp+capsule#p1152390
This forum is a goldmine of resources/techniques/material selection for anyone wanting to build XPS foam projects!
How this boat is constructed is really cool. I'm hoping I can put something together using this method. So far, I'm thinking small houseboat, or maybe small (2-4 person) sailboat. If it would be robust enough, maybe a small sailboat you could sleep on. Well, just dreaming for now.
ReplyDeleteI really like your SUP and I am sure I will try to make something similar for one of my grandchildren.
ReplyDeleteGreetings from Karl ( Austria )
I must know around what this wieghs. I do alot of back lake fishing and walk in. I am curious, if I add shoulder straps to the top, can I carry it on my back or is it too heavy?
ReplyDelete